

Introduction
VMware is moving the focus toward the public- and the hybrid cloud. VMware Cloud on Amazon Web Service (VMConAWS) is one of their Cloud Service pillars and it delivers a fully managed vSphere SDDC experience completely build on top of AWS public cloud services. An ideal platform for customers who don’t want to be bothered by the underlying datacenter infrastructure. even without any technical knowhow you can set up a complete vSphere SDDC (VMConAWS) within 2 hours.
This offering is highly anticipated and so VMware introduced a badge for it, called: VMware Cloud on AWS Management Exam 2019 (exam nr. 5V0-31.19). This is a 30 item exam, a passing score of 300 must be achieved and must be taken within 45 minutes.
Study Guide
First of all, I’ve started with reading the exam preperation guide. It gives you a list of topics which you must know.
Main subjects are:
- Architecture and Technologies
- Products and solutions
- Configure and Manage
- Optimize
- Troubleshoot
- Administration and Operations.
I will address them in the paragraps below:
Section 1 – VMware Cloud on AWS and AWS Architectures and Technologies
Objective 1.1 – Describe AWS architecture
Amazon Web Services (AWS) is a public cloud offering and delivers a wide variety of cloud services (including compute, storage and networking) from the internet with a pay-as-you-go methodology. Compute (CPU/MEM) services are delivered as “Elastic Compute Cloud” instances (more familiar a “EC2”-instances). EC2 instances can be delivered as either physical or as virtualized servers in a wide variety of specifications. You can see a EC2 instance as a physical PC/servers which still needs an Operating System. The operating systems are delivered as Amazon Machine Images (called AMI’s) and can be manually created if the correct one is not available.
To store data, AWS delivers multiple storage options:
- Object-based (called: “Simple Storage Services”, or Amazon S3)
- Block-based (called “Elastic Block Storage”, or Amazon EBS)
- File-based (called: “Elastic File System”, or Amazon EFS)
AWS delivers a wide variety of networking service options, which I will touch very briefly (I’m not going to dive deep into this subject as these are out of scope for this exam).
AWS uses a Virtual Private Cloud (VPC) construct for defining an isolated environment were you can define public and private IP subnets, which can be used by other AWS services (for example EC2 instances). Each logical interface used within the VPC is called an Elastic Network Interface (ENI) and are identified by ‘eni-xxxxxxxx’, and includes IP-addressing, MAC-addressing and a description. Each VPC contains at least 1 route-table; IP subnets must be mapped to route-table and are associated with the default route-table by default. One default route-table exist but you can create custom route-tables as desired. The VPC contains an implicit router, subnets that are connected to a route-table can communicate with each other. For access to and from the internet an Internet Gateway must be deployed, which is capable of routing public IP subnets to/and from the internet. The Internet Gateway is identified by ‘igw-xxxxxxxx’. Also NAT-gateways are available and there is a possibility for site-to-site Virtual Private Networks (VPNs) through a Virtual Private Gateway. VPCs enables multiple levels of security, by using Security Groups and/or network ACL’s.
So you may have noticed that an VPC resembles the same as your on-premise network environment, but then in the public cloud. Below an example of a VPC on AWS.

Amazon Route 53 is the service called which delivers DNS services (UDP/53). Amazon Direct Connect is a service which allows you to connect directly to a VPC from your location (datacenter/office/etc), without the need to make a connection over the internet.
Amazon Web Services Global Infrastructure is built around Regions and Availability Zones (AZs). A regions contains (typical) 3 physically separated and isolated availability zones, which are interconnected by low-latency, high throughput, and highly redundant network links. The Availability Zones provide high-availability, fault tolerance and scalability options for customers. AWS Local Regions consist of one datacenter location, which can be used for disaster recovery.
Below the overview of AWS Regions including the AZs.

For role based access AWS uses the Identity & Access Management (IAM) module.
Objective 1.2 – Describe VMware Cloud on AWS
VMware Cloud on AWS is a on-demand public cloud service which allows you too, as the name implies, run the VMware SDDC stack on dedicated Amazon EC2 instances. VMConAWS gives the full operational consistency with the on-premise VMware SDDC stack and allows fast and easy bi-directional workload migrations to the public cloud (AWS). VMConAWS allows you to use and integrate native AWS service more easily compared to on-premise SDDC solutions.

The VMConAWS is built upon the VMware Cloud Foundation platform and consists of the following components:
- VMware vSphere (including VMware vCenter server) for virtualized compute.
- VMware Virtual SAN (VSAN) for virtualized storage. (first versions were built upon NSX-V, newer deployments use NSX-T)
- VMware NSX for Datacenter for virtualized networking.VMConAWS SDDC
VMConAWS SDDC details
The VMware SDDC stack is managed, deployed and maintained by VMware. as a customer you don’t have to be concerned about the upgrades and maintenance of VMConAWS SDDC.
By default (standalone) VMConAWS clusters are deployed in one region and in one availability zone: VMware High-Availability protects against host-failures. New VMConAWS clusters are deployed in the same region and availability zone as the first one. One vCenter server is deployed for one account: you can have multiple VMConAWS SDDC clusters be part of this one vCenter server.
VMConAWS also delivers stretched clusters, which allows you to deploy a VMware SDDC spanning multiple (currently a maximum of 2) Availability Zones. This mitigates against Availability Zone failures. A standalone VMConAWS deployment cannot be converted to a stretched cluster, only during the VMConAWS SDDC creation phase a stretched cluster can be formed. The vSAN stretched cluster allows synchronous writes across the two availability zones.
Which version of (standalone or stretched) cluster you want to use depends on the use case and the application availability requirements. Currently only one stretched cluster in a VMConAWS SDDC is supported.
With VMConAWS a new feature is introduced to VSAN: With VSAN used for VMConAWS SDDC clusters two (2) datastores are created (instead of one (VSAN-)datastore): one datastore is used for management components and one is used for the workloads. The management datastore is managed by VMware, the workload datastore is managed by the Cloud Administrator.
A single host starter option is also available: This option only runs for a maximum of 30 days, to be able to continue to work with this environment it must be expanded to a 3 node standalone cluster within those 30 days. It provides a low-cost entry point for Proof of Concepts. Be aware that this version cannot be expanded to a stretched cluster.
A standalone VMConAWS, spanning a single Availability Zone, requires a minimum of 3 hosts and can be expanded, on a per-host basis. A stretched VMConAWS cluster requires 3 hosts per Availability Zone (for quorum), currently a minimum of 6 hosts is required. A VMConAWS stretched cluster can only be expanded with hosts pairs which are deployed across AZs to a maximum of 16 hosts. Standalone VMConAWS clusters currently support up to 16 hosts. native VSAN supports cluster sizes up to 64 hosts, but these are not alligned with VMConAWS.
A customer can create 10 SDDC’s, each SDDC may contain 20 clusters (each with 16 hosts).
The default VSAN storage policy describe how the storage of a VM should be handled. The default VSAN storage policy is configured with RAID-1 and a PFTT=1. This protects agains one host failure. Other VSAN Storage policy configuration are supported and are described here.
For the ESXi hosts in each AZ, a IP subnet is required: when deploying a stretched cluster 2 IP subnets are required (one Ip subnet of each AZ). When deploying the first VMConAWS SDDC cluster a IP subnet for the management components is required. When provisioning the IP subnets be aware of the future growth that must can fit into the IP subnet.
During the creation of the VMConAWS SDDC 2 resource pools are created: one for the management components and one for the workloads.
Objective 1.3 – Explain licensing, pricing, and billing
VMConAWS is a on-demand service and uses a pay-per-use pricing model, charged on a per-hour basis/billed per month. VMConAWS is also available as a 1 year and 3 year subscription service. All used VMware licenses (for vSphere, VSAN and NSX) are included in this price model.
VMConAWS billing is handled through VMware Cloud services: The billing cycle begins on the day of the month when the first service for your organization was set up. The host resources usage from AWS is tracked and aligned with the billing cycle of VMware Cloud Services. Other AWS native services (EBS-usage, IP addressing, etc) are billed the 5th of each month and are based on the usage up to the last day of the previous month.
Objective 1.4 – List the AWS services
See Objective 1.1 – Describe AWS architecture
This paragraph contains a list of VMConAWS related services, a complete list of AWS services can be found here.
Objective 1.5 – Describe the integrations with AWS
VMware Cloud is based on VMware Cloud Foundation, consisting of vSphere, VSAN and NSX. The ESXi hypervisor hosts form the basis of the vSphere platform and are directly installed on dedicated bare-metal EC2 “I3.metal” instances (physical servers) within a AWS VPC.
The i3.metal EC2 instances have the following specifications:
- 2x (custom built) Intel E5-2686 V4 CPUs (2,3 GHz/18 cores)
- 512 GiB RAM
- 8 x 1.9 TiB NVMe SSD storage across 2 diskgroups
- 25 Gbps network bandwidth

This “I3.metal” EC2 instance has one limitation as it cannot be expanded with more storage. Nowadays VMConAWS supports to use Amazon Elastic Block Storage (EBS) as underlying storage capacity for VSAN. These are provided by “R5.metal” EC2 instances

the R5.metal EC2 instance have different specifications:
- 2x Intel Xeon Platinum 8175M (2.5 GHz/24 Cores)
- 768 GiB RAM
- no local storage
- 14 Gbps EBS bandwidth
- 25 Gbps network bandwidth
- available storage available per EC2 instance varies between 15 TiB an 35 TiB, storage can be added in blocks of 5 TiB.
More information about EBS backed VSAN EC2 instances can be found here.
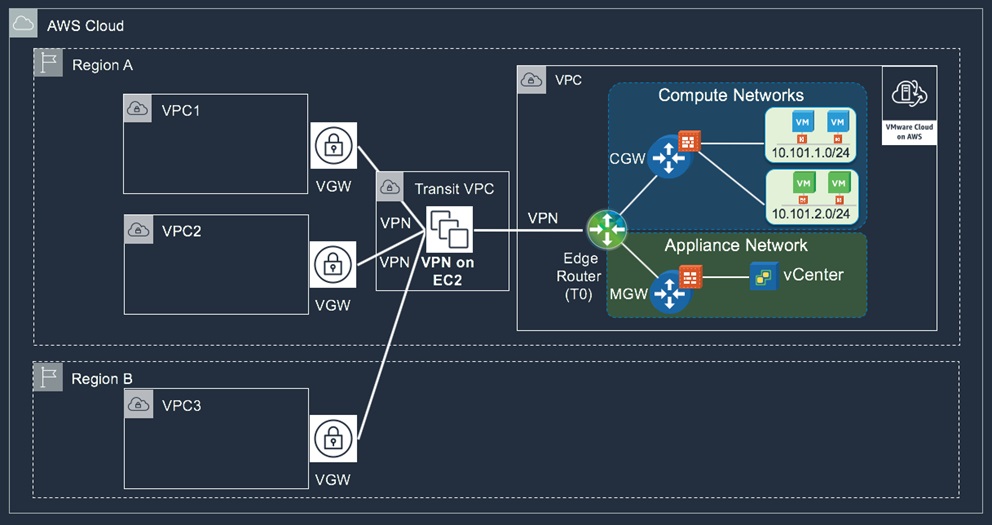
The VPC consist of two gateways:
A Management Gateway: The MGW is an NSX Edge Security gateway that provides north-south network connectivity for the vCenter Server* and NSX Manager* running in the SDDC. The Internet-facing IP address (Public IP #1) is automatically assigned from the pool of AWS public IP addresses when the SDDC is created. The management logical network internal to your SDDC is assigned the CIDR block 10.0.0.0/16 by default. When you create your SDDC, you can assign a different address block to prevent address conflicts with other environments that you connect to your SDDC.
A Customer Gateway: The CGW provides north-south network connectivity for virtual machines running in the SDDC. VMware Cloud on AWS creates a default logical network to provide networking for these VMs. You can create additional logical networks using the vSphere Client.
When deployed with NSX-T both gateways are deployed as Tier-1 routers which are connected to a NSX-T Tier-0 router, which provides the SDDC with North-South connectivity.
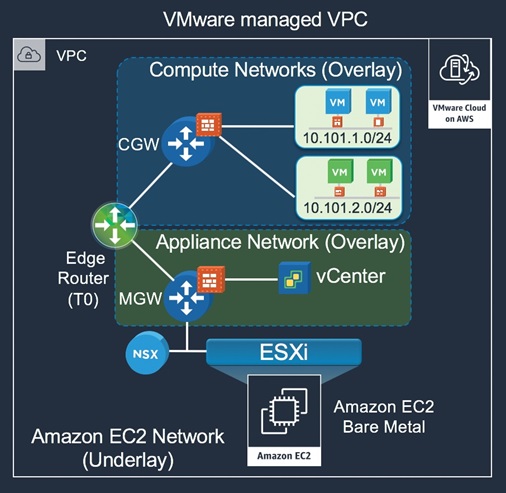
When VMConAWS is deployed with NSX-V (for vSphere), the gateways are deployed as NSX Edge Service Gateway (ESG)appliances. New deployments are deployed with NSX-T.
*note: the VMware vCenter server and the NSX Manager are deployed within the SDDC. The resource they are using are being payed by the customer.
The available network bandwidth available for North-South routing is 25Gbps.
Both gateway’s have the firewall functionality turned on, which can/must be managed from the VMware Cloud Services management console. To allow access a VPN or firewall rule must be created. The default rule is set to Deny
VMware SDDC and AWS Integration
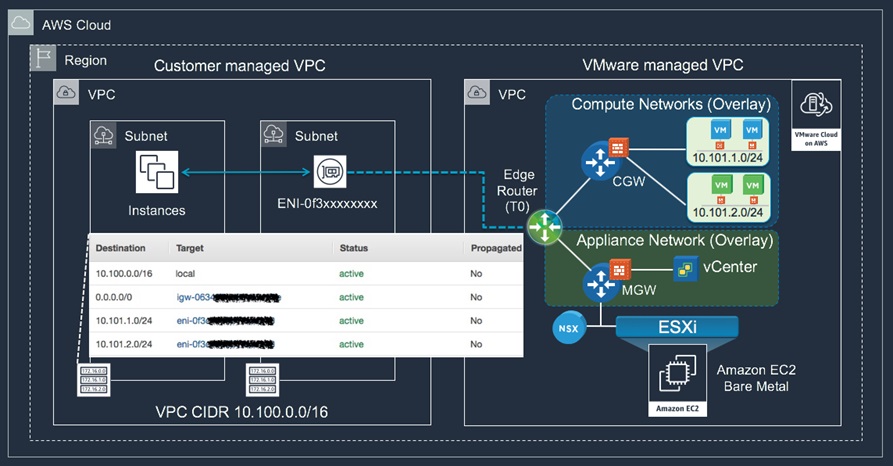
To achieve integration with AWS native services you connect a VMConAWS VPC to a customer VPC of choice which has AWS native services enabled. This process occurs when you deploy the VMware SDDC on AWS. This enables a high-bandwidth, low-latency interface between the SDDC and the services in the customer VPC.
To do this, VMware Cloud Management Services requires access to the customer VPC for creating and modifying ENI’s and the route-table. By running an AWS CloudFormation template/script a managed policy within the AWS IAM is being created, which allows the required access.
The VMware Cloud Management Services creates ENI’s in the subnet which the customer chooses, these ENIs are directly attached to the ESXi hosts in the VMConAWS SDDC where the active NSX Tier-0 router is running. Only one active ENI is being used: This ENI is used for connectivity between the VMConAWS SDDC and the customer VPC. In case of a vMotion, failure or other event, the ENI and route-table are updated according. The created ENI’s have a description set to “VMware VMC Interface”.
There are three primary approaches to enable connectivity between SDDCs and customer-managed VPCs (other than the connected VPC where VMware cloud ENIs are provisioned which are describe above)
For more information about connecting a VMConAWS SDDC VPC to other customer VPCs click here.
In the customer selected VPC you can deploy EC2 instances or create S3 bucket endpoints (or other AWS services), which can be used within the VMConAWS SDDC.
Objective 1.6 – Show how to use AWS Cloud Formation to deploy an SDDC
AWS CloudFormation is a text-based modelling tool that enables you to create templates that describe all the features of an VMware Cloud on AWS SDDC or any other AWS infrastructure.
Procedure:
- Log in to the AWS console and go to the US West (Oregon) region.
- Retrieve the CloudFormation Create SDDC Template from the vmwaresamples repository on Github.
- Open the AWS CloudFormation service and click Create new stack.
- Upload the template you retrieved in Step 2.In the AWS CloudFormation > Stacks > Create stack window, click Upload a template to Amazon S3 and choose the vmc-aws-cloud-cf-template.txt template. Click Next.
- Specify a name for the new stack, then click Next and Create.
- Specify SDDC variables for use by the AWS Lambda function.In the AWS CloudFormation > Stacks > Stack Detail window. In the Resources section, you can see an IAM role and a Lambda Function. Click the Physical ID value of the Lambda function and enter the Environment variables that provide configuration details for the SDDC.
| Name | Description |
| connected_account_id | The Amazon account ID used to connect the SDDC. Returned by the VMC API request ‘GET /orgs/{org}/account-link/connected-accounts’ as the value of id. |
| customer_subnet_ids | This is the ID of the subnet (not the actual subnet address). Returned by the VMC API request ‘GET /orgs/{org}/account-link/compatible-subnets’ as the subnet_id of the subnet_cidr_block that you want to use. |
| currently unimplemented | |
| vpc_cidr | Subnet CIDR block for management traffic. Default is 10.2.0.0/16 |
| name | The name of the SDDC to be created |
| numOfHosts | The number of hosts initially added to the SDDC |
| orgId | Can be found in the VMware Cloud on AWS API or as part of the UI under an existing SDDC connection and the Support Info tab |
| region | Must be US_WEST_2 |
| user_refresh_token | Can be found in the VMware Cloud on AWS UI by clicking on your name at the top right and then the Oauth Refresh Token button. |
7. Save and run the AWS Lambda function to create the SDDC from the template.
Click Save, then click Test to open the Configure test event window.
Give the test event a name and click Create.
This procedure is being used to create a VMConAWS SDDC.
Section 2 – VMware Cloud on AWS Products and Solutions
Objective 2.1 – Show how to work with On-Premises vSphere
The exam requires you to have a basic understanding of vSphere, VSAN and NSX for on-premise environments. VMConAWS is a public cloud offering and can be used in conjunction with your on-premise VMware environment.
VMConAWS connectivity
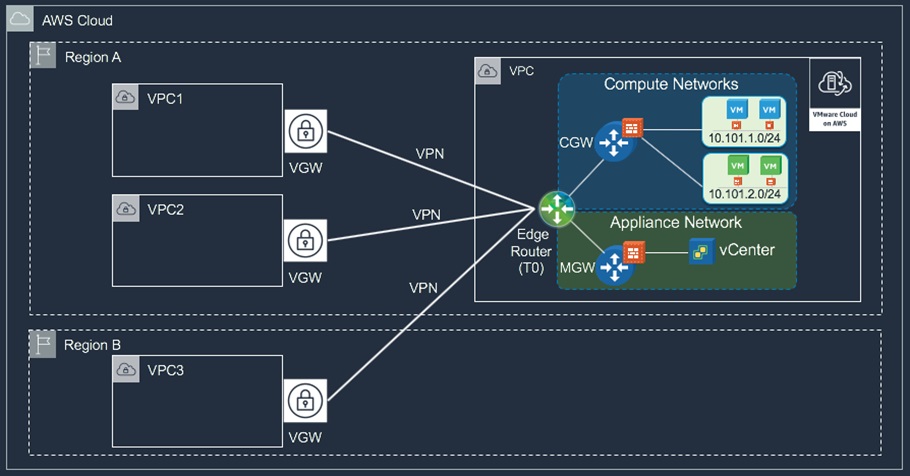
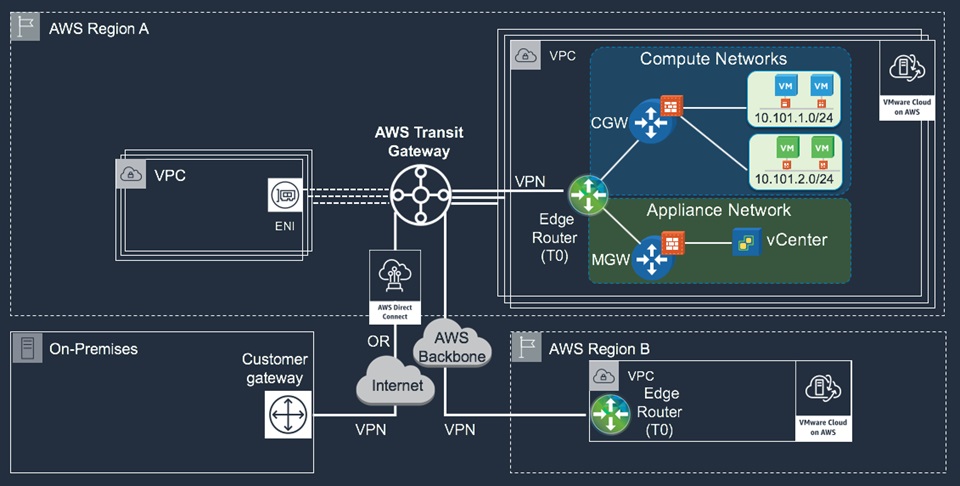
To be able to work with both the on-premise VMware environment and the VMConAWS SDDC, network connectivity is required. You’ve got multiple options to establish connectivity: Route-based IPsec VPN*, Policy-bases IPsec VPN* or AWS Direct Connect. The AWS Direct Connect option delivers the highest bandwidth between the on-premise datacenter and VMConAWS.
*You can only create on VPN between the on-premise datacenter and VMConAWS, This VPN will be used for both the management- en compute-gateways.
AWS Direct Connect allows you to extend 16 network segments into a VPC. AWS Direct Connect uses Private Virtual Interfaces to connect with AWS Services within a single VPC. Public Virtual Interfaces are used to connect directly to AWS endpoint (public IP addresses) in a given region. Private Virtual Interfaces are primarily used for connecting a on-premise datacenter to the VMConAWS SDDC, Public Virtual Interfaces are used for connecting to AWS native services (EC2 public IP addresses and/or S3 buckets).

Direct Connect sessions in VMware Cloud on AWS environment now use BGP Private ASN 64512 for the default local ASN. The local ASN is editable and any private ASN can be used (64512 to 65534). If ASN 64512 is already being used in your on-premises environment, you must use a different ASN. Before this change, the AWS public ASNs were used: 17493 in the Asia Pacific (Singapore) region, 10124 in the Asia Pacific (Tokyo) region, 9059 in the EU (Ireland) region, and 7224 in other regions.
The connectivity options are extensively described in the following whitepaper, but you can also watch this (NET321) Re:Invent presentation.
For managing both on-premise VMware environment from a single pane of glass you can use the Hybrid Linked Mode to link the on-premise and the VMConAWS vCenters together. This allows you to hot migrate VM’s to and from the VMConAWS SDDC.
Objective 2.2 – Explain Hybrid Linked ModeH
Each environment (on-premise/VMConAWS) is managed by its own VMware vCenter server, but they can be linked to each other creating a single pane of glass by using Hybrid Linked Mode. If your on-premise environment already uses Enhanced Linked mode, all connected vCenters will be linked in the VMConAWS vCenter server allowing you to view and manage the inventories of both environments, migrate workloads and share tags and tag categories from your on-premise environment.

To establish the Hybrid Linked Mode there are 2 options available:
- You can install the Cloud Gateway Appliance and use it to link from your on-premises data center to your VMConAWS SDDC. In this case, Active Directory groups are mapped from your on-premises environment to VMConAWS. You do not need to add Active Directory as an identity source in your VMConAWS vCenter Server
- You can link from your VMConAWS SDDC to your on-premises data center. In this case, you must add Active Directory as an identity source to the VMConAWS vCenter Server.
A few common prerequisites apply for Hybrid Linked Mode:
- Ensure that your on-premises data center and your cloud SDDC are synchronized to an NTP service or other authoritative time source. When using Hybrid Linked Mode, VMware Cloud on AWS can tolerate a time skew of up to ten minutes between the on-premises data center and the cloud SDDC.
- Configure a management gateway IPsec VPN connection between your on-premises data center and VMConAWS SDDC.
- The maximum latency between your VMConAWS SDDC and on-premises data center must be 100 msec roundtrip.
- Decide which of your on-premises users you want to grant Cloud Administrator permissions to. Add these users to a group within your identity source. Ensure that this group has access to your on-premises environment.
- Ensure that you have login credentials for a user who has a minimum of read-only access to the Base DN for users and groups in your on-premises environment.
- Ensure that an on-premises DNS server is configured for your management gateway so that it can resolve the FQDN for the identity source.
- Ensure that your on-premises gateway or firewall allows access to the necessary ports from your VMConAWS SDDC for the following services:
| Service | Ports |
| On-premises vCenter Server | 443 |
| On-premises Platform Services Controller | 389,636 |
| On-premises Active Directory server | 389,636,3268,3269 |
| On-premises DNS | 53 |
- Ensure that you have the login credentials for your on-premises vSphere SSO domain.
A few additional prerequisites apply for linking with the VMC Cloud Gateway appliance:
- Your on-premises environment is running vSphere 6.5 patch d or later.
- You can link only one on-premises SSO domain (including multiple on-premise vCenters) and one VMConAWS SDDC vCenter.
- Ensure that your on-premises Platform Services Controller is configured to use HTTPS port 443. If the Platform Services Controller is configured to use another port, Cloud Gateway Appliance deployment does not work.
- Verify that the host on which you intend to the install the Cloud Gateway Appliance appliance meets the following hardware requirements
| Hardware | Minimum required |
| CPUs | 2 |
| Memory | 24 GB |
| Storage | 25 GB |
A few additional prerequisites apply for linking from the VMConAWS SDDC.
- Your on-premises vCenter Server system is running one of the following:
- vSphere 6.0 Update 3 patch c or later: Hybrid Linked Mode supports on-premises vCenter Server systems running 6.0 Update 3 patch c and later with either embedded or external Platform Services Controller (both Windows and vCenter Server Appliance). vCenter Server systems with external Platform Services Controller instances linked in Enhanced Linked Mode are also supported, up to the scale limits documented in https://www.vmware.com/pdf/vsphere6/r60/vsphere-60-configuration-maximums.pdf.
- vSphere 6.5 patch d and later.
- You can link only one on-premises SSO domain.
- Run the Connectivity Validator tests to check that network connectivity is correctly stablished for Hybrid Linked Mode.
Hybrid Link Mode is required for migrating workloads with vMotion (see paragraph Objective 2.6 – Explain how to migrate VMs).
Objective 2.3 – Explain Hybrid Cloud Extension
Hybrid Cloud Extension is a public VMware Cloud Service which allows secure, high performance workload migrations across on-premise vSphere platforms and VMware Clouds (among which VMConAWS).

With VMware HCX you are able to hot migrate (a.k.a. vMotion) without downtime or cold migrate VMs (which includes a reboot), but you can also use the bulk migration option to migrate complete environments to another VMware cloud. No modification on the application/workload is needed: on-premise logical networks (VLAN’s/portgroups) are extended to the VMware Cloud. With the builtin WAN optimizer the available bandwidth utilization is used as efficient as possible.
VMware HCX consist of the following components:
- VMware HCX Manager: This components is installed from the VMware Cloud service into the management zone and is connected to each site’s vCenter server and provides a single pane for VMware HCX administration. The VMware HCX Manager provides a framework for deploying VMware HCX service VMs across both the local and remote sites, VMware HCX administrators are authenticated, and each task authorized through the existing vSphere SSO Identity sources. With VMware Public Cloud offering the VMware HCX Cloud Manager variant is deployed on the public cloud site, the VMware HCX Enterprise Manager is being deployed in the on-premise environment. In the NSX Hybrid Connect mode (private-to-private-cloud deployments) the VMware HCX Enterprise Manager is deployed in both sites.
- HCX-IX Interconnect Appliance: This appliance provides replication and vMotion-based migration capabilities
- HCX-WAN-Optimization Appliance: This appliance improves performance characteristics of the WAN links by applying optimization techniques like the data de-duplication and line conditioning.
- HCX Network Extension Virtual Appliance:The VMware HCX Network Extension service provides a late Performance (4–6 Gbps) Layer 2 extension capability. The extension service permits keeping the same IP and MAC addresses during a Virtual Machine migration. Network Extension with Proximity Routing enabled ensures that forwarding between virtual machines connected to extended and routed networks, both on-premises and in the cloud, is symmetrical.
With VMware HCX Network Extension (HCX-NET-EXT), a High-Performance (4–6 Gbps) service, you can extend the Virtual Machine networks to an VMware HCX enabled remote site. Virtual Machines that are migrated or created on the extended segment at the remote site are Layer 2 next to virtual machines placed on the origin network. Using Network extension a remote site’s resources can be quickly consumed. With Network Extension , the default gateway for the extended network only exists at the origin site. Traffic from Virtual Machines (on remote extended networks) that must be routed returns to the origin site gateway.

- Using VMware HCX Network Extension with VMware HCX Migration you can retain the IP and MAC addresses of the Virtual Machine and honor the existing network policies.
- Extend VLAN networks from VMware’s vSphere Distributed Switch.
- Extend VXLANs (Requires NSX integration at the origin site).
- Extend Cisco’s Nexus 1000v networks.
- VMware HCX deploys the Remote Site HCX-NET-EXT appliance automatically whenever a local appliance is deployed. The HCX-NET-EXT service appliance is always deployed as a pair.
Objective 2.4 – Explain how to use Content Library Files
Content libraries are container objects for VM Templates, vApp templates, and other types of files. vSphere administrators can use the templates in the library to deploy virtual machines and vApps in the vSphere inventory. Sharing templates and files across multiple vCenter Server instances in same or different locations brings out consistency, compliance, efficiency, and automation in deploying workloads at scale.
Local Libraries
You use a local library to store items in a single vCenter Server instance. You can publish the local library so that users from other vCenter Server systems can subscribe to it. When you publish a content library externally, you can configure a password for authentication.
VM templates and vApps templates are stored as OVF file formats in the content library. You can also upload other file types, such as ISO images, text files, and so on, in a content library.
Subscribed Libraries
You subscribe to a published library by creating a subscribed library. You can create the subscribed library in the same vCenter Server instance where the published library is, or in a different vCenter Serversystem. In the Create Library wizard you have the option to download all the contents of the published library immediately after the subscribed library is created, or to download only metadata for the items from the published library and later to download the full content of only the items you intend to use. To ensure the contents of a subscribed library are up-to-date, the subscribed library automatically synchronizes to the source published library on regular intervals. You can also manually synchronize subscribed libraries.
You can subscribe the VMConAWS vCenter Content Library to a on-premise Content Library.
This subscription requires a HTTP(S) connection between vCenter servers.
Objective 2.5 – Explain how to create virtual machines (VMs)
You can deploy a VM from a .vmtx template.
Procedure
- From the vSphere Client VMs and Templates view, right click the template and select New VM from This Template.
- Proceed through the Deploy From Template wizard, using the following settings.
- For the VM folder, select Workloads, Templates, or another folder that you have write permissions on.
- For the compute resource, select Compute-ResourcePool.
- For the datastore, select workloadDatastore.
The Content Onboarding Assistant automates the transfer of .vmtx templates, ISO images, scripts, and other files from the on-premise environment to your VMConAWS SDDC.
You have two options for how the Content Onboarding Assistant transfers .vmtx templates to your SDDC
– Convert these templates to OVF templates in the SDDC Content Library. This option takes less time.
– Transfer these templates as .vmtx templates in the vCenter Server inventory. In this case, the templates undergo an intermediate conversion to OVF and then back to .vmtx templates.
You can use the Content Onboarding Assistant on any MacOS, Linux, or Windows machine that has network access to your on-premises data center and your SDDC.
Objective 2.6 – Explain how to migrate VMs
Hybrid migration refers to migrating virtual machines between an on-premises data center and a VMConAWS SDDC. The following hybrid migration use cases are supported:
- Migration with vMotion from on-premises data center to cloud SDDC
- Migration with vMotion from cloud SDDC to on-premises data center (with some restrictions for VMs previously migrated from on-premises data centers explained below)
- Cold migration from on-premises data center to VMConAWS SDDC and back.
- Using HCX, bulk migration, migration with vMotion, and cold migration from the on-premises data center to the VMConAWS SDDC and back.
The restrictions on the method “migration with vMotion” that apply to VMs previously migrated from on-premises data centers are as follows:
- VMs that use standard virtual switches for networking cannot be migrated back to an on-premises data center after being migrated to the cloud SDDC.
- Any VM that has been power-cycled in the cloud SDDC can only be migrated back to an on-premises host or cluster with the Broadwell chipset or a compatible EVC mode.
- If your on-premises hosts haven’t been patched to address vulnerability to side channel analysis due to speculative execution (also referred to as the Spectre Variant 2 vulnerability), this may affect vMotion compatibility as shown in Table 5‑1. To find the correct patch for your on-premises hosts, see (https://kb.vmware.com/s/article/52245). All hosts in VMware Cloud on AWS SDDCs have been patched.
The following migration options are available:
| Migration Type | Interface Type | Method/usage |
| Migration with vMotion | UI | – for Single VMs: vSphere client (requires Hybrid Link Mode – HCX |
| Migration with vMotion | CLI/Automation | – API – PowerCLI – HCX |
| Bulk Migration | UI or CLI/Automation | HCX |
| Cold Migration | UI | – for Single VMs: vSphere client (requires Hybrid Link Mode – HCX |
| Cold Migration | CLI/Automation | – API – PowerCLI – HCX |
For migration type “migrations with vMotion” a Layer 2 connections (AWS Direct connect or L2 VPN) is required for the network to which the VM/Workload is connected, also a minimum bandwidth of 250 Mbps and a maximum latency of 100 ms round trip is required between the source and destination VMkernel interfaces,
Each migration type has one or more migration methods. VMware HCX offers the richest migration possibilities: It can handle all types of migrations. VMware HCX can migrate pre-vSphere 6.0 workloads from non-Disitributed vSwitches(DVS) (vSS/Cisco Nexus 1000v) to the VMConAWS cloud. This is not possible with migration types vMotion and Cold Migration solely. These migration types require compatible vSphere and DVS*versions.
*When the on-premise DVS is version 6.5, the DVS version used on VMConAWS SDDC must be upgraded prior migration.
When using migration type “bulk migration” the storage is replicated in the backgroud: the workload continue to work. After the replication is completed the workload is being restarted on VMConAWS SDDC: a small outage occurs.
For migration type “migration with vMotion” specific firewall ports must be opened, which are described in this document.
For migration type “Cold migration” specific firewall ports must be opened, which are described in this document.
Objective 2.8 – Describe VMware DRS, HA, and vSphere FT
This is basic vSphere knowledge, i’m only going to briefly touch this subject. Elastic DRS is feature introduced and only available for VMConAWS.
VMware Distributed Resource Scheduler (DRS), enables resource management for a vSphere cluster. DRS enables vSphere cluster to distribute the load evenly over the vSphere cluster: This happens at the initial placement of a VM or the load is checked on a regular interval (15 minutes) and vMotions are executed to create a balanced vSphere cluster.
The placement of the VM is depending on DRS affinity rules: These are rules to which running VMs must apply in relation tho host-placement. There are two types of DRS affinity rules: VM-Host affinity rules and VM-VM affinity rules.
Elastic DRS enables VMConAWS vSphere cluster to automatically scale when required. Every 5 minutes the resource utilization is checked, based on the outcome over a period of time (spikes and dips are averaged) additional hosts are added to the vSphere cluster (to a configured maximum), or hosts are removed from the cluster when the resource utilization is below the threshold (but are not scaled down to the minimum amount of hosts required). A scale-out actions can only occur once every 30 minutes, a scale-in action can only occurs once every 3 hours. By setting the Elastic DRS policy to “optimized for performance” to decision algorithm is adjusted: hosts are added more quickly and removing hosts actions are executed more slowly, when the policy is set to “optimize for Lower Cost” hosts are added slowly but hosts are removed more quickly.
Elastic DRS allows for some intervention:
- You’re allow to manual add or remove hosts, but Elastic DRS in some point in time can revert this change. The Elastic DRS policy will be honored. When a manual add/remove host action is being executed the Elastic DRS recommendation are ignored, if the manual action has finished Elastic DRS is again able to create recommendations (and can roll-back the manual request).
- Planned Maintenance: When a manual maintenance occurs, Elastic DRS will not add or remove hosts. After the maintenance has finished Elastic DRS can again create recommendations.
- Auto-Remediate: When a host fails, Elastic DRS can add a host to the vSphere cluster. This allows the VMware Cloud Management Service to replace the failed hardware without the loss of the needed resources.
- SDDC maintenance: if the VMware Cloud Management Service team is undergoing maintenance of is planned to execute maintenance in the coming 6 hours, Elastic DRS recommendations are ignored.
*Elastic DRS is not supported with stretched clusters or single host-VMConAWS clusters.
VMware High-Availability (HA), enables vSphere cluster to mitigates against host failures. When a host failure occurs, the VM’s that were hosted on the failed host are restarted on other available hosts (without manual intervention).
Admission Control reserves hardware capacity needed to accomodate against host failures within a vSphere cluster. for example: If one host failure is tolerated, enough capacity on the other hosts are maintained to fulfill the capacity need for this failure. This allows the VM’s to be restarted in case of a host failure. With stretched clusters 50% of the resources are reserved for mitigations agains a AZ failure.
vSphere Fault Tolerance, enables VM’s to run a secondary synchronous copy on another host. If the primary VM (or underlying hosts) fails, the secondary VM will become automatically active without any disruption. The primary and secondary VM are running in a lock-step state: which mean that the running processes are synced. in case of failure the secondary can take over the active role without any interference.
Section 4 – Configure and Manage VMware Cloud on AWS
Objective 4.1 – Install and configure VMware Identity Manager
This topic is a little bit strange, as it is not a part of the VMConAWS SDDC solution. It can be used (is required) when deploying VMware Horizon 7 onto VMConAWS.

I do not want to spend a lot of time on this subject, so here you go.
Objective 4.2 – Manage VMware Identity Manager
same here.
Objective 4.3 – Outline the VMware Cloud on AWS permissions
Compared to objective 4.1 and 4.2, this objective is very interesting and you should/must learn this.
VMware vCenter server uses a role-based access/object-level permission model: Permissions to vSphere objects are assigned to user or groups through roles. as the figure below outlines:

Permissions can be assigned through;
- vCenter Server Permission: The permission model for vCenter Server systems relies on assigning permissions to objects in the object hierarchy. Each permission gives one user or group a set of privileges, that is, a role for a selected object.
- Global Permissions: Global permissions are applied to a global root object that spans solutions.
- Group Membership in vCenter Single Sign-On Groups: For VMware Cloud on AWS, a Cloud Administrator group is predefined in vCenter Single Sign-On. When you use Hybrid Linked mode, you add this group to the linked domain. The cloudadmin@vmc.local user is not a member of other vCenter Single Sign-On groups, such as the Administrator group.
With VMConAWS there following 5 roles are available:
| role | Description |
| CloudAdmin | The CloudAdmin role has the necessary privileges for you to create and manage workloads on your SDDC. However, you cannot access or configuring the certain management components that are supported and managed by VMware, such as hosts, clusters, and management virtual machines. |
| CloudGlobalAdmin | The CloudGlobalAdmin role is associated with global privileges and allows you to create and manage content library objects and perform some other global tasks. |
| Administrator | Users with the Administrator role for an object are allowed to view and perform all actions on the object. This role also includes all privileges of the Read Only role. If you have the Administrator role on an object, you can assign privileges to individual users and groups. If you are acting in the Administrator role in vCenter Server, you can assign privileges to users and groups in the default vCenter Single Sign-On identity source. Supported identity services include Windows Active Directory and OpenLDAP 2.4. By default, the administrator@vsphere.local user has the Administrator role on both vCenter Single Sign-On and vCenter Server after installation. That user can then associate other users with the Administrator role on vCenter Server. |
| Read Only | Users with the Read Only role for an object are allowed to view the state of the object and details about the object. For example, users with this role can view virtual machine, host, and resource pool attributes, but cannot view the remote console for a host. All actions through the menus and toolbars are disallowed. |
| No Access | Users with the No Access role for an object cannot view or change the object in any way. New users and groups are assigned this role by default. You can change the role on an object-by-object basis. The administrator of the vCenter Single Sign-On domain, administrator@vsphere.local by default, the root user, and vpxuser are assigned the Administrator role by default. Other users are assigned the No Access role by default. |
Objective 4.4 – Describe how to configure VMware Cloud on AWS permissions
Permission are assigned through the VMConAWS vCenter server.
Adding permissions.
Procedure
1 Browse to the object for which you want to assign permissions in the vSphere Client object navigator.
2 Click the Permissions tab.
3 Click the Add Permission icon.
4 Select the user or group that will have the privileges defined by the selected role.
a From the User drop-down menu, select the domain for the user or group.
b Type a name in the Search box.
The system searches user names and group names.
c Select the user or group.
5 Select a role from the Role drop-down menu.
6 (Optional) To propagate the permissions, select the Propagate to children check box.
The role is applied to the selected object and propagates to the child objects.
7 Click OK to add the permission.
Changing permissions
Procedure
1 Browse to the object in the vSphere Client object navigator.
2 Click the Permissions tab.
3 Click a row to select a permission.
| Task | Steps |
| Change permissions | a Click the Change Role icon. b Select a role for the user or group from the Role drop-down menu. c Toggle the Propagate to children check box to change permission inheritance. d Click OK. |
| Remove permissions | Click the Remove Permission icon |
Objective 4.5 – Explain security hardening for VMware Cloud on AWS
The following part has been taken from the vSphere hardening guide (and is not particular for VMConAWS).
The following guidelines help ensure security of your environment.
Use Named Accounts
Make sure that applications use unique service accounts when connecting to a vCenter Server system.
Minimize Access
Do not allow users to log directly in to the vCenter Server host machine. Users who are logged in to the vCenter Server host machine can cause harm, either intentionally or unintentionally, by altering settings and modifying processes. Those users also have potential access to vCenter credentials, such as the SSL certificate. Allow only users who have legitimate tasks to perform to log in to the system and ensure that login events are audited.
Restrict Users From Running Commands in a Virtual Machine
By default, a user with the vCenter Server Administrator role can interact with files and programs within a virtual machine’s guest operating system. To reduce the risk of breaching guest confidentiality, availability, or integrity, create a custom nonguest access role without the Guest Operations privilege.
Verify vSphere Client Certificates
Instruct users of one of the vSphere Client or other client applications to never ignore certificate verification warnings. Without certificate verification, the user might be subject of a MiTM attack.
vCenter Password Requirements and Lockout Behavior
To manage your vSphere environment, you must be aware of the vCenter Single Sign-On password policy, of vCenter Server passwords, and of lockout behavior.
vCenter Single Sign-On Administrator Password
The password for the administrator of vCenter Single Sign-On, administrator@vsphere.local by default, is specified by the vCenter Single Sign-On password policy. By default, this password must meet the following requirements:
- At least 8 characters
- At least one lowercase character
- At least one numeric character
- At least one special character
The password for this user cannot be more than 20 characters long. Starting with vSphere 6.0, non-ASCII characters are allowed. Administrators can change the default password policy. See the Platform Services Controller Administration documentation.
vCenter Server Passwords
In vCenter Server, password requirements are dictated by vCenter Single Sign-On or by the configured identity source, which can be Active Directory, OpenLDAP.
vCenter Single Sign-On Lockout Behavior
Users are locked out after a preset number of consecutive failed attempts. By default, users are locked out after five consecutive failed attempts in three minutes and a locked account is unlocked automatically after five minutes. You can change these defaults using the vCenter Single Sign-On lockout policy. See the Platform Services Controller Administration documentation. Starting with vSphere 6.0, the vCenter Single Sign-On domain administrator, administrator@vsphere.local by default, is not affected by the lockout policy. The user is affected by the password policy.
Section 5 – Optimize VMware Cloud on AWS
Objective 5.1 – Show how to size the SDDC
The website vmcsizer.vmware.com helps customers with determine the right size for a new VMConAWS cluster deployment.
Although hosts can be added within 10 minutes, there are other (mostly financial) reasons to keep the amount of hosts low. VMware vRealize Operation can help customers via its Capacity Reclaimable dashboard. This view helps customers to quickly find and automatically reclaim unused disk, CPU and memory from your virtual environment and right-size your workloads for the cloud.
Objective 5.2 – Explain cluster management
In paragraph Objective 1.2 – Describe VMware Cloud on AWS the VMConAWS clusters have been described.
Through the website vmc.vmware.com new clusters can be added, removed and/or hosts can be manually added and remove to/from a cluster. This is not done through the vCenter server itself.
Objective 5.3 – Define host remediation
Host remediation is managed by the VMware Cloud Management team, no manual intervention is needed by a customer:
What is Automated Cluster Remediation?
Automated Cluster Remediation is the process by which VMware will swap out a failed or problematic host within an instance of VMConAWS to ensure service levels are maintained and completely transparent to the end user.
At a high level, VMware will automatically detect a failed host and then introduce a new host into the effected VMware Cluster. The failed or problematic host is put into maintenance mode and evacuated from the cluster.
Section 6 – Troubleshoot VMware Cloud on AWS
Objective 6.1 – Define best practice maintenance
As told earlier: Elastic DRS and Cluster Auto-remediation is introduced for VMConAWS, which enables a hands-off approach for VMConAWS customers.
Failed hosts are automatically replaced by new EC2 instances and VMware HA will restart VM if needed.
Objective 6.2 – Outline support and staying up-to-date
New features are added regular to VMConAWS which can be tracked on this website.
The status of VMWare Cloud Services itself can be tracked here.
VMConAWS is supported by the VMware Cloud Management team which 24/7 can be contacted through chat or a Support/Service Request (SR) via the website vmc.vmware.com.
Objective 6.3 – Define common troubleshooting steps
Check Network/DNS/delete cookies.
from the vmc.vmware.com there are some options to execute some troubleshooting tests.
Section 7 – VMware Cloud on AWS Administration and Operations
Objective 7.1 – Describe VMware vSAN in VMware Cloud on AWS
In paragraph Objective 1.2 – Describe VMware Cloud on AWS VSAN have been described detail.
Objective 7.2 – Explain how to use Amazon S3 with VMware Cloud on AWS
As described in parapgraph Objective 1.5 – Describe the integrations with AWS the VMConAWS SDDC VPC is connected to another Amazon VPC.
procedure
- Create a S3 endpoint in the Amazon VPC.
- Add a firewall rule to the Security Group associated with the Amazon VPC for allowing HTTPS from the VMConAWS SDDC VPC.
- check if the ENI is enabled for the S3 endpoint (this is enabled by default).
- via the vmc.vmware.com website add firewall rules to the compute gateway for allowing S3 access from the VM’s.
If you do not want that a S3 endpoint can access a S3 bucket, you can configure access though the Internet Gateway.
Follow the procedure below:
- configure access on the S3 bucket from the VMConAWS SDDC via the internet.
- disable any S3 endpoint
- via the vmc.vmware.com website add firewall rules to the compute gateway for allowing S3 bucket from the VM’s.
More information can be found here.
Objective 7.3 – Explain how to use Amazon EFS with VMware Cloud on AWS
Amazon Elastic File Services (EFS) cannot be used as VMware Datastore, but can be accessed from linux VM. EFS can be seen as Network File Shares (NFS).
Procedure
- add firewall rules to the compute gateway for allowing access to the connected Amazon VPC
- Add a firewall rule to the Security Group associated with the Amazon VPC for allowing NFS from the VMConAWS SDDC VPC.
- Create a Amazon NFS.
- Add the NFS to (linux) VM’s,
for more information click here.
Objective 7.4 – Describe VMware Cloud on AWS networking
This topic has been described in parapgraph Objective 1.5 – Describe the integrations with AWS in detail.

Objective 7.5 – Show how to configure management gateway networking
can be modified using the http://vmc.vmware.com website.
Objective 7.6 – Show how to configure compute gateway networking
can be modified using the http://vmc.vmware.com website.
Objective 7.7 – Explain inter-SDDC networking
This topic has been described in parapgraph Objective 1.5 – Describe the integrations with AWS in detail.
Reference
For this study guide i’ve used the following references:
- https://docs.vmware.com/en/VMware-Cloud-on-AWS/services/vmc-on-aws-getting-started.pdf
- https://docs.vmware.com/en/VMware-Cloud-on-AWS/services/vmc-aws-operations.pdf
- https://docs.vmware.com/en/VMware-Cloud-on-AWS/services/vmc-on-aws-networking-security.pdf
- https://docs.vmware.com/en/VMware-Cloud-on-AWS/services/vmc-aws-manage-data-center.pdf
- https://aws.amazon.com/vmware/faqs/
- https://cloud.vmware.com/vmc-aws/faq
- https://docs.vmware.com/en/VMware-Cloud-on-AWS/services/com.vmware.vmc-aws-operations/GUID-04B3F890-2661-4EBE-A887-95ACD698F091.html
- This blog: http://www.gilles.cloud/2018/03/deploy-your-first-sddc-in-vmware-cloud.html
- This blog: http://vmusketeers.com/2019/01/06/5v0-31-19-vmware-cloud-on-aws-management-exam-2019-study-tips-and-my-notes/
- This blog: https://virtualg.uk/vmware-cloud-on-aws-software-defined-data-center-2019-exam-tips/
Conclusion
For those who have been reading throughly, you have missed section 3 .. this section is not a part of the exam right now.
be aware don’t use this study guide solely, read the blueprint and the referenced whitepapers and then you should be good to go!
